If you’re searching for how to make a gaming desk, you’re likely looking for something sturdy, stylish, and customized to your gaming setup. Building your own gaming desk is not only cost-effective but also gives you full control over size, height, cable management, and aesthetics—something store-bought desks often fail to deliver.
This detailed, Google-friendly guide explains exactly how to make a gaming desk from scratch. It’s written in a professional tone, optimized for fast indexing, and structured with clear H2 and H3 headings—without keyword stuffing.
Why Build Your Own Gaming Desk?
A custom gaming desk offers several advantages over pre-built options.
Key Benefits
- Perfect size for your room and gear
- Better weight support for monitors and PCs
- Improved cable management
- Custom height for ergonomics
- More durable materials
- Lower cost compared to premium desks
If you want a desk that truly fits your gaming style, DIY is the way to go.
Planning Your Gaming Desk Design
Before cutting wood or buying materials, proper planning is essential.
Decide the Desk Size
Consider:
- Available room space
- Monitor size (single or multiple)
- Keyboard and mouse movement area
- PC tower placement
Recommended dimensions:
- Width: 120–160 cm
- Depth: 60–75 cm
- Height: 72–75 cm (adjustable preferred)
Choose the Desk Style
Popular gaming desk styles include:
- Minimal flat-top desk
- L-shaped gaming desk
- Standing or adjustable-height desk
- Desk with built-in shelves
Choose a design that complements both gaming and productivity.
Materials Needed to Make a Gaming Desk
Essential Materials
- Wooden tabletop (plywood, MDF, or solid wood)
- Desk legs (metal or wooden)
- Screws and bolts
- Wood glue
- Sandpaper (medium and fine grit)
- Wood filler (optional)
- Paint, laminate, or wood finish
Optional Add-ons
- Cable management tray
- Monitor mount
- RGB LED strips
- Headphone hook
- Power strip holder
Tools Required
You don’t need professional tools, but these basics help a lot:
- Measuring tape
- Drill and drill bits
- Screwdriver
- Level tool
- Saw (if cutting wood yourself)
- Clamps (optional)
- Safety gloves and goggles
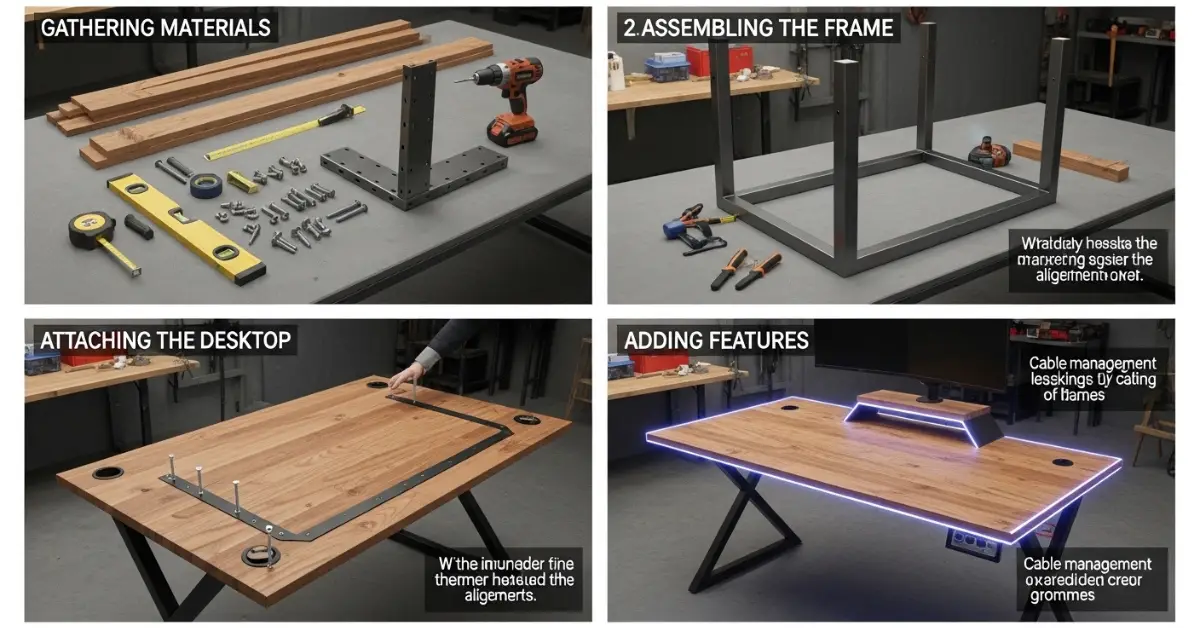
How to Make a Gaming Desk Step by Step
Step 1: Prepare the Tabletop
Start with the desk surface.
Instructions
- Measure and mark your desired dimensions
- Cut the wood if needed
- Sand all edges and surfaces smoothly
- Fill cracks or holes with wood filler
- Let it dry completely
A smooth tabletop improves both comfort and durability.
Step 2: Apply Finish or Paint
This step defines the desk’s look.
Finish Options
- Matte black or white paint
- Wood stain for a premium feel
- Laminate or vinyl wrap
- Clear varnish for natural wood
Apply 2–3 coats, allowing proper drying time between layers.
Step 3: Attach the Desk Legs
This is the structural foundation of your gaming desk.
How to Attach
- Flip the tabletop upside down
- Position legs evenly from corners
- Use a measuring tape to align correctly
- Drill pilot holes
- Secure legs with screws
Use a level tool to ensure the desk stands straight.
Step 4: Add Reinforcement (Optional but Recommended)
If you’re using a large tabletop or multiple monitors, reinforcement is crucial.
Reinforcement Ideas
- Wooden support beam under the desk
- Metal brackets
- Center leg for extra stability
This prevents sagging over time.
Step 5: Install Cable Management Solutions
Cable management is what separates a gaming desk from a regular desk.
Cable Management Tips
- Install a cable tray underneath
- Drill grommet holes at the back
- Use Velcro straps or cable clips
- Mount a power strip under the desk
Clean cable routing improves airflow and aesthetics.
Step 6: Mount Gaming Accessories
Enhance functionality by adding accessories.
Popular Add-ons
- Monitor arm mount
- Headphone holder
- Controller stand
- Cup holder (to prevent spills)
Position accessories where they’re easy to reach without clutter.
Ergonomic Setup Tips for Gaming Desks
A good desk should support long gaming sessions comfortably.
Desk Height and Seating
- Elbows should rest at 90 degrees
- Monitor top should align with eye level
- Feet should rest flat on the floor
Mouse and Keyboard Space
- Keep at least 30 cm of mouse movement area
- Keyboard should sit flat, not angled too high
Ergonomics improve performance and reduce fatigue.
Choosing the Right Wood for a Gaming Desk
Different woods offer different benefits.
Common Options
- Plywood: Affordable and strong
- MDF: Smooth finish but heavy
- Solid wood: Premium look and durability
- Butcher block: Excellent for high-end builds
Choose based on budget, weight capacity, and aesthetics.
Budget Breakdown for a DIY Gaming Desk
Estimated Costs
- Tabletop: Low to mid-range
- Legs/frame: Moderate
- Hardware and tools: Minimal
- Accessories: Optional
In most cases, a DIY gaming desk costs significantly less than premium market options while offering better customization.
Common Mistakes to Avoid
Skipping Measurements
Always double-check measurements before drilling.
Weak Desk Legs
Cheap legs can wobble under heavy setups.
Poor Cable Planning
Install cable solutions before setting up hardware.
Ignoring Weight Load
Ensure the desk can handle monitors, PC, and accessories.
Avoiding these mistakes ensures long-term stability.
Maintenance Tips for Your Gaming Desk
Keep your desk looking and performing like new.
Maintenance Checklist
- Tighten screws every few months
- Clean surface regularly
- Avoid excessive moisture
- Check cable mounts and brackets
Proper maintenance extends the life of your desk.
Frequently Asked Questions
Can I Make a Gaming Desk Without Power Tools?
Yes, but basic tools like a drill make the process easier and safer.
How Long Does It Take to Build a Gaming Desk?
Typically 2–4 hours, depending on design complexity.
Is a DIY Gaming Desk Strong Enough?
Yes, if built with proper materials and reinforcement.
Final Thoughts
Learning how to make a gaming desk gives you full control over comfort, performance, and style. With the right planning, materials, and setup, you can build a desk that outperforms expensive store-bought options—both functionally and visually.
If you want, I can:
- Optimize this content for featured snippets
- Add schema-ready FAQs
- Customize it for small rooms, budget builds, or RGB-focused setups