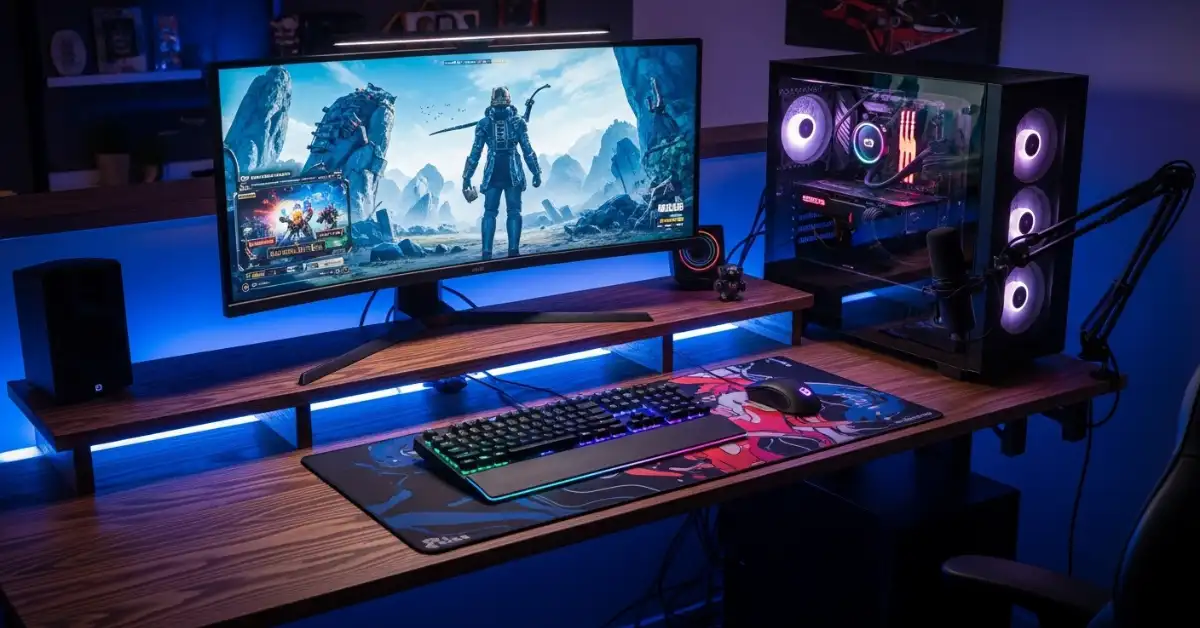
If you’re a dedicated gamer, you know that comfort, space, and setup organization can make or break your gaming experience. A well-designed gaming desk not only looks cool but also supports your gear, improves ergonomics, and enhances gameplay. Instead of buying an expensive pre-built desk, learning how to build a gaming desk gives you the freedom to customize it exactly the way you want — from size and materials to cable management and lighting.
In this detailed guide, you’ll learn everything you need to know about building a gaming desk from scratch, step-by-step. Whether you want a simple, budget-friendly setup or a professional gaming station, this guide will help you create your perfect battle station.
Why Build Your Own Gaming Desk?
Before getting into the steps, let’s explore why building your own gaming desk is worth it.
- Customization: You can adjust the size, shape, and height to fit your room and gaming gear.
- Cost Control: You decide the budget — build a premium desk or a simple one with affordable materials.
- Ergonomics: A custom-built desk can be tailored for proper posture, preventing strain during long gaming sessions.
- Aesthetics: Choose materials, colors, and LED lighting that match your gaming style.
Building your own gaming desk isn’t just a project — it’s an experience that lets you design a space that reflects your personality and enhances your focus.
Step-by-Step Guide: How to Build a Gaming Desk
Let’s go through each stage of building a functional and stylish gaming desk.
Plan Your Design and Space
Before buying materials, plan your desk based on your gaming needs and room size.
Ask yourself these questions:
- How many monitors will you use?
- Do you need space for a PC tower, speakers, or consoles?
- Will it be a standing desk or a traditional seated one?
Tip: Measure the available space and sketch a rough layout. The average desk height is around 29–30 inches, but you can adjust it based on your comfort level. If you use multiple monitors, go for a wider surface — at least 55 to 60 inches long.
Choose the Right Materials
The material you select will determine your desk’s durability and appearance. Here are the most popular options:
Wood
Wood is the top choice for DIY gaming desks. It’s strong, looks premium, and can be easily customized.
- Plywood: Budget-friendly and easy to cut.
- Solid wood (oak, maple, pine): More durable and stylish.
- MDF (Medium-Density Fiberboard): Affordable and smooth, ideal for painting.
Metal
Metal frames add stability and a modern touch. You can use steel legs or pre-made metal desk frames.
Glass
A glass top can look sleek but may not be suitable for heavy setups. If you go for glass, use tempered glass for safety.
Pro Tip: Combine wood with metal for a sturdy and modern gaming desk design.
Gather Tools and Materials
Here’s a checklist of what you’ll need:
- Measuring tape and pencil
- Saw (hand or circular)
- Drill and screws
- Sandpaper or sander
- Paint or wood stain
- L-brackets or metal legs
- Cable management accessories (clips, trays, grommets)
- LED strip lights (optional)
Make sure you have all your tools ready before starting the build.
Cut and Prepare the Desk Top
Once your design and materials are set, cut your desk top according to the planned dimensions. If you’re using plywood or MDF, sand the edges smoothly to prevent splinters.
After cutting, apply a wood stain or paint for a finished look. Choose colors that complement your gaming setup — black, walnut, and matte finishes are popular choices. Apply a sealant for protection against scratches and spills.
Build the Desk Frame or Legs
Now it’s time to build the base that supports your desktop.
You can either:
- Build wooden legs using 2×4 planks, or
- Attach pre-made metal legs for a faster and cleaner build.
Ensure the legs are evenly spaced for balance. If you’re creating an L-shaped desk, add a center support beam for stability. Use L-brackets to connect the legs to the desktop securely.
Add Cable Management and Power Setup
A clean, organized desk makes your gaming experience smoother. Plan for cable management before setting up your devices.
Use:
- Cable trays under the desk for hiding wires.
- Cable clips and Velcro ties to bundle cords.
- Grommet holes for passing cables through the desktop neatly.
If you use multiple devices, consider adding a power strip with USB ports under the desk. This keeps your setup tidy and prevents tripping hazards.
Test Stability and Comfort
Once everything is installed, check your desk for any wobbling or uneven surfaces. Tighten screws, level the legs, and ensure all components are secure.
Sit down and test your position — your monitor should be at eye level, and your wrists should rest naturally when using the keyboard. Adjust as needed to prevent long-term discomfort.
Additional Tips for Building a Gaming Desk
Here are a few extra tips to help you perfect your desk build:
- Add a keyboard tray if you prefer more desk space.
- Use anti-slip pads under the legs to prevent movement.
- Consider a sit-stand desk design for better posture and flexibility.
- Personalize the design with LED strips, decals, or a unique paint finish.
- Ventilation: Leave space around your PC tower for air circulation.
Remember, the best gaming desk isn’t about luxury — it’s about comfort, efficiency, and personalization.
Common Mistakes to Avoid
Even experienced builders make mistakes when designing a gaming desk. Avoid these pitfalls:
- Not measuring the room properly: Always double-check your measurements before cutting materials.
- Poor cable management: Messy wires can ruin the look and cause accidents.
- Ignoring ergonomics: Incorrect height or posture can lead to back and neck strain.
- Using weak materials: Always ensure your desk can handle the weight of your gaming setup.
By keeping these points in mind, you’ll save time and create a desk that lasts for years.
Conclusion
Building your own gaming desk is a fun, rewarding project that gives you total control over your setup’s design, functionality, and comfort. From choosing durable materials to adding personal touches like lighting and cable management, every step brings you closer to the perfect gaming environment.
Now that you know how to build a gaming desk, it’s time to grab your tools, plan your design, and start crafting the ultimate command center for your gaming adventures. Whether you’re a casual player or a professional streamer, your custom-built gaming desk will make every session more enjoyable and immersive.